I’ve encountered way too many Magento installations that were never configured to execute the Magento cron job, ultimately causing confusion and problems. This post is meant to be a tutorial to help people enable and setup the cron job to execute as required by Magento, as well as answer some questions as to why the Magento cron job should be enabled.
What Is a Cron Job?
A cron job is an automated event that is triggered by the server. Cron jobs are used to run periodic maintenance or scheduled activities.
What Does Magento Use Its Cron Job For?
By default, the cron job in Magento is used to handle activities that require a script to be run periodically. These activities include, but are not limited to:
- Catalog Price Rules
- Sending Newsletters
- Generating Google Sitemaps
- Customer Alerts/Notifications
- Updating Currency Rates
- Scheduled Log Cleanup
Cron Job Configuration Methods
There are several different ways to configure the Magento cron job to execute, and a quick Google search will show a plethora of different methods. I’ve shown two below that work on the majority of Linux/Unix-based web hosts I have encountered.
Configuration 1. A Magento Cron Job Using WGET
*/15 * * * * wget -q http://www.mydomainname.com/cron.php
Configuration 2. A Magento Cron Job Using Command Line PHP
*/15 * * * * /local/path/to/php -f /local/path/to/magento/cron.php
I generally recommend that most installations setup the Magento cron job to utilize the wget method, due to its simplicity; however, either method works and is generally accepted as correct.
Creating the Cron Job Configuration
You can configure either method above to execute using the crontab or control panel of your favorite web host (i.e. cPanel). The instructions necessary to bring up the crontab and/or edit the crontab through cPanel are shown below.
Method 1. Using Crontab
First, you will need to open the crontab editor, which is used to maintain and edit your cron job entries.
To open the cron tab as the user you are currently logged in as type:
crontab -e
Or, if you wish to open the crontab editor as a specific user, you’ll need to type the following command, replacing username with the specific username you wish to use:
crontab -u username -e
Once the crontab editor is open, you’ll simply type out (or copy and paste) one of commands above, leveraging either the wget or command line PHP method. Save the file and exit to complete your cron job configuration. Note: Each cron job entry needs to occupy its own line within the crontab file. Failure to do so will result in less than desirable results, and a multitude of failures!
Method 2. Using cPanel
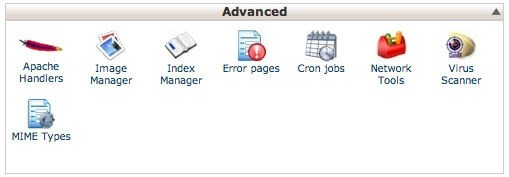
Step 1. Under the “Advanced” section of your cPanel control panel, you’ll find the “Cron jobs” item. Click on this to enter the cron job configuration screens.
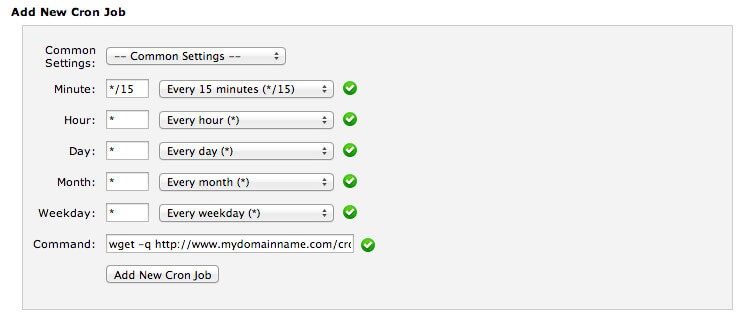
Step 2. Find the form section named “Add New Cron Job”, and fill out the necessary settings for the Magento cron job.
I recommend the following configuration, which is configured to run every 15 minutes, every day. I see a lot of configurations out there that recommend running the cron job every 5 minutes; however, I’ve found that 15 tends to be a little less resource intensive for those that are running on shared hosting platforms. If you have a dedicated server, feel free to configure it to run every 5 minutes.
- Minute: */15 (Every 15 minutes)
- Hour: * (Every hour)
- Day: * (Every day)
- Month: * (Every month)
- Weekday: * (Every weekday)
- Command: wget -q http://www.mydomainname.com/cron.php
Your screen should look similar to the following when completed:
Step 3. Click “Add New Cron Job” to save the cron job configuration.
NOTE: More information on the jobs that are configured to run in Magento by default can be found on the Magento Wiki, found here).

